How to Use Step-by-Step Math to Mastery Resources
Posted by Angela Dansie on
A Quick Guide to Teaching with Step-by-Step Math to Mastery
Here are some of the questions answered in this post:

Where are the lesson plans?
Lesson workbooks contain all that is needed for both the student and the teacher.
There is no separate teacher manual or lesson plan.
Resources are designed to be open and teach.
Steps to follow are written next to each model, helping the teacher “think out loud” with clear, precise language.
Where Should Students Start? How Do They Progress?
- First, you’ll give the placement test, or a section of that assessment, to find a starting point.
- Then, you’ll print the lesson workbook.
- Each workbook has an example IEP goal and objectives written for you.
- You can start by teaching a lesson a day and adjust the pace as needed.
- Reviews and tests are included in the workbook.
- When it is complete, you’ll print the next lesson workbook in the sequence and continue on.
The recommended sequence can be found at the beginning of each lesson workbook.
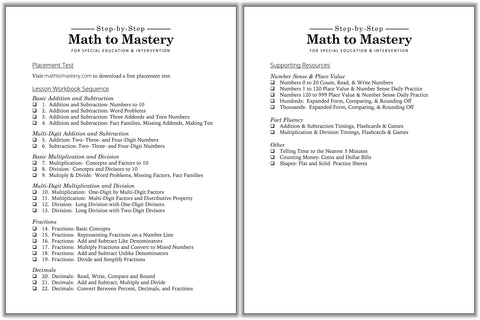
You can download the free placement test at mathtomastery.com
How Long Does a Lesson Take? What Does it Look Like?
There is not just one right way to use the workbooks. They can be adapted to your student needs, your setting, and time constraints.
Here's how I use the lesson workbooks:
My setting is a small group pull-out at the elementary level (mild/moderate).
Students sit at a kidney table facing me and a white board behind me.
Warm-up:
- We begin with a number sense & place value warm-up.
- This may include skip counting, missing number flashcards, and a page from a daily number sense practice workbook.
Model: 5 minutes
- I state the lesson objective and write one model problem on the white board at a time and think out loud while I demonstrate each step.
- I ask students to repeat and recite the steps, rules, and vocabulary with me.
Guided Practice: 10 minutes
- During guided practice I continue working problems on the board. I ask students for the next step as if they are coaching me through the problems.
- When they are answering confidently, I often have a student come to the board to work a problem. I’ve found students enjoy the chance to “be the teacher” and it gives the others a chance to practice being a respectful audience.
Independent Practice: 15 minutes (more or less)
- Students spread out and go to their individual tables/desks where they can focus quietly during this time.
- They work at their own pace, quietly, and raise their hands when finished so I can quickly check their work and give immediate feedback.
- Quick finishers might be given a set of fact flashcards or a fluency timing to practice while the others finish.
Adjusting the Pace and Reviewing:
When I have a group that is answering accurately and flying at a faster pace, I reduce the number of practice problems and may do two lessons a day.
If we have time, we do a few word problems together or practice telling time or counting money—whatever I’d like to spend a few minutes reviewing.
How to Prompt Student Responses Using a Direct Instruction Model
Lessons are divided into model problems, guided practice, and independent practice to facilitate gradual release of responsibility.
- Model each skill step-by-step and think out loud while you demonstrate.
- Give many opportunities for each student to respond during guided practice.
- Don’t move to independent practice until students are confident with the skill.
Keep engagement high by prompting frequent responses from each student.
Here's what I mean:
Model: Teacher solves problems on the white board or on the paper so everyone can see.
Talk through the problem out loud, step by step.
Have students recite the steps and any new rules or vocabulary as you work.
Guided Practice: Teacher and students work problems together.
Solve together on the white board, projector or teacher’s paper.
- Start with → Teacher models correct response before asking a question
“First we look at the sign. What do we do first, everyone?”
- Fade to → Whole group choral responses
“What is the next step, everyone?”
- Fade to → Individual responses
“What numbers are in the tens column, . . . Andrew?”
- Fade to → Solve on individual papers at the same time
More Options:
- Invite students to come to the board and demonstrate solving problems and talking through the steps. Give each student a chance to be the “teacher” while others practice being a respectful audience.
-
Pair students up with a partner. Both solve the same problem, then they quickly compare answers. Or they may take turns demonstrating how to solve a problem while the other watches and checks the answer.
Independent Practice: Students work quietly at their own pace.
They may ask for help if needed, but encourage and praise independent work.
Check answers as you walk around the room and give immediate feedback if possible.
Any tips for preparing and organizing materials?
Once you have decided which lessons to teach, you may want to print and bind individual student workbooks.
1. Print the student booklet cover onto colored cardstock for a bit of durability
2. Print the lesson pages double-sided. Black & white, no color ink needed.
3. Bind the workbook together using what you have access to (staple, spiral binding, comb binding, three-hole punched in a binder, or with binder rings)
In my classroom . . .
- I would plan what I would teach the coming month and spend an hour of my prep time printing and assembling student workbooks.
- The method I used was a double-hole-punch at the top, fastening booklets together with two 1” binder rings. I fastened workbooks at the top to avoid anything on the sides interfering with handwriting.
- Each math group had a separate Sterilite™ bin to store the workbooks in as well as any flashcards or base ten blocks or other manipulatives.
- After students finished a workbook I would take the binder rings out and staple the book to send home. Then I re-used the binder rings in the next workbook.
I know these lessons are a lot of pages, and it can be a concern when you are limited in the number of pages you may print and copy. If you live in an area with a print shop it may be worth looking into having them printed there if your school will reimburse you.
How is the new (in 2022) reorganized version different from the original edition?
In the first edition of Step-by-Step Math to Mastery™ there are 52 resources plus a second version of each of those resources for older students without the “cute” clip art. That’s a lot of pdf files. These original resources are still available in my store on Teachers Pay Teachers. (Click here to see the complete bundle of all original resources on TpT. Links to individual resources are in the product description.)
In the second edition, the goal was to streamline and simplify. Several resources were combined. There are fewer resources because the same material is contained in fewer downloads. There is only one version (no decorative top art), so lessons can be used with students in elementary, middle school, or high school. Now there are 32 resources. Much more manageable! When two or three resources were combined into one download, the price was lowered--it is less than buying the original resources separately. (Click here to see the new K-5 Math bundle on Math to Mastery)
Thanks for your interest!
I hope this post gives you a clearer picture of how these resources can improve your math instruction and save you hours of precious planning time.
If you have more questions don't hesitate to reach out and contact me at angela@mathtomastery.com